Converters and Options
Introduced with v0.7.0, converters define how Excel ranges and their values are converted both during reading and writing operations. They also provide a consistent experience across xlwings.Range objects and User Defined Functions (UDFs).
Converters are explicitely set in the options method when manipulating Range objects
or in the @xw.arg and @xw.ret decorators when using UDFs. If no converter is specified, the default converter
is applied when reading. When writing, xlwings will automatically apply the correct converter (if available) according to the
object’s type that is being written to Excel. If no converter is found for that type, it falls back to the default converter.
All code samples below depend on the following import:
>>> import xlwings as xw
Syntax:
| xw.Range | UDFs | |
|---|---|---|
| reading | xw.Range.options(convert=None, **kwargs).value |
@arg('x', convert=None, **kwargs) |
| writing | xw.Range.options(convert=None, **kwargs).value = myvalue |
@ret(convert=None, **kwargs) |
Note
Keyword arguments (kwargs) may refer to the specific converter or the default converter.
For example, to set the numbers option in the default converter and the index option in the DataFrame converter,
you would write:
xw.Range('A1:C3').options(pd.DataFrame, index=False, numbers=int).value
Default Converter
If no options are set, the following conversions are performed:
- single cells are read in as
floatsin case the Excel cell holds a number, asunicodein case it holds text, asdatetimeif it contains a date and asNonein case it is empty. - columns/rows are read in as lists, e.g.
[None, 1.0, 'a string'] - 2d cell ranges are read in as list of lists, e.g.
[[None, 1.0, 'a string'], [None, 2.0, 'another string']]
The following options can be set:
ndim
Force the value to have either 1 or 2 dimensions regardless of the shape of the range:
>>> import xlwings as xw
>>> sht = xw.Book().sheets[0]
>>> sht.range('A1').value = [[1, 2], [3, 4]]
>>> sht.range('A1').value
1.0
>>> sht.range('A1').options(ndim=1).value
[1.0]
>>> sht.range('A1').options(ndim=2).value
[[1.0]]
>>> sht.range('A1:A2').value
[1.0 3.0]
>>> sht.range('A1:A2').options(ndim=2).value
[[1.0], [3.0]]
numbers
By default cells with numbers are read as
float, but you can change it toint:>>> sht.range('A1').value = 1 >>> sht.range('A1').value 1.0 >>> sht.range('A1').options(numbers=int).value 1
Alternatively, you can specify any other function or type which takes a single float argument.
Using this on UDFs looks like this:
@xw.func
@xw.arg('x', numbers=int)
def myfunction(x):
    # all numbers in x arrive as int
    return x
Note: Excel always stores numbers internally as floats, which is the reason why the int converter rounds numbers first before turning them into integers. Otherwise it could happen that e.g. 5 might be returned as 4 in case it is represented as a floating point number that is slightly smaller than 5. Should you require Python’s original int in your converter, use raw int instead.
dates
By default cells with dates are read as
datetime.datetime, but you can change it todatetime.date:Range:
>>> import datetime as dt
>>> sht.range('A1').options(dates=dt.date).value
UDFs:
@xw.arg('x', dates=dt.date)
Alternatively, you can specify any other function or type which takes the same keyword arguments as
datetime.datetime, for example:>>> my_date_handler = lambda year, month, day, **kwargs: "%04i-%02i-%02i" % (year, month, day) >>> sht.range('A1').options(dates=my_date_handler).value '2017-02-20'
empty
Empty cells are converted per default into
None, you can change this as follows:- Range:
>>> sht.range('A1').options(empty='NA').value - UDFs:
@xw.arg('x', empty='NA')
- Range:
transpose
This works for reading and writing and allows us to e.g. write a list in column orientation to Excel:
Range:
sht.range('A1').options(transpose=True).value = [1, 2, 3]UDFs:
@xw.arg('x', transpose=True)
@xw.ret(transpose=True)
def myfunction(x):
    # x will be returned unchanged as transposed both when reading and writing
    return x
expand
This works the same as the Range properties
table,verticalandhorizontalbut is only evaluated when getting the values of a Range:>>> import xlwings as xw >>> sht = xw.Book().sheets[0] >>> sht.range('A1').value = [[1,2], [3,4]] >>> rng1 = sht.range('A1').expand() >>> rng2 = sht.range('A1').options(expand='table') >>> rng1.value [[1.0, 2.0], [3.0, 4.0]] >>> rng2.value [[1.0, 2.0], [3.0, 4.0]] >>> sht.range('A3').value = [5, 6] >>> rng1.value [[1.0, 2.0], [3.0, 4.0]] >>> rng2.value [[1.0, 2.0], [3.0, 4.0], [5.0, 6.0]]
Note
The
expandmethod is only available onRangeobjects as UDFs only allow to manipulate the calling cells.
Built-in Converters
xlwings offers several built-in converters that perform type conversion to dictionaries, NumPy arrays,
Pandas Series and DataFrames. These build on top of the default converter, so in most cases the options
described above can be used in this context, too (unless they are meaningless, for example the ndim in the case
of a dictionary).
It is also possible to write and register custom converter for additional types, see below.
The samples below can be used with both xlwings.Range objects and UDFs even though only one version may be shown.
Dictionary converter
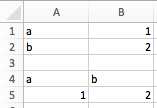
The dictionary converter turns two Excel columns into a dictionary. If the data is in row orientation, use transpose:
>>> sht = xw.sheets.active
>>> sht.range('A1:B2').options(dict).value
{'a': 1.0, 'b': 2.0}
>>> sht.range('A4:B5').options(dict, transpose=True).value
{'a': 1.0, 'b': 2.0}
Numpy array converter
options: dtype=None, copy=True, order=None, ndim=None
The first 3 options behave the same as when using np.array() directly. Also, ndim works the same as shown above
for lists (under default converter) and hence returns either numpy scalars, 1d arrays or 2d arrays.
Example:
>>> import numpy as np
>>> sht = xw.Book().sheets[0]
>>> sht.range('A1').options(transpose=True).value = np.array([1, 2, 3])
>>> sht.range('A1:A3').options(np.array, ndim=2).value
array([[ 1.],
       [ 2.],
       [ 3.]])
Pandas Series converter
options: dtype=None, copy=False, index=1, header=True
The first 2 options behave the same as when using pd.Series() directly. ndim doesn’t have an effect on
Pandas series as they are always expected and returned in column orientation.
index: int or Boolean- When reading, it expects the number of index columns shown in Excel.When writing, include or exclude the index by setting it to
TrueorFalse. header: Boolean- When reading, set it to
Falseif Excel doesn’t show either index or series names.When writing, include or exclude the index and series names by setting it toTrueorFalse.
For index and header, 1 and True may be used interchangeably.
Example:
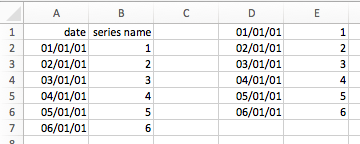
>>> sht = xw.Book().sheets[0]
>>> s = sht.range('A1').options(pd.Series, expand='table').value
>>> s
date
2001-01-01    1
2001-01-02    2
2001-01-03    3
2001-01-04    4
2001-01-05    5
2001-01-06    6
Name: series name, dtype: float64
>>> sht.range('D1', header=False).value = s
Pandas DataFrame converter
options: dtype=None, copy=False, index=1, header=1
The first 2 options behave the same as when using pd.DataFrame() directly. ndim doesn’t have an effect on
Pandas DataFrames as they are automatically read in with ndim=2.
index: int or Boolean- When reading, it expects the number of index columns shown in Excel.When writing, include or exclude the index by setting it to
TrueorFalse. header: int or Boolean- When reading, it expects the number of column headers shown in Excel.When writing, include or exclude the index and series names by setting it to
TrueorFalse.
For index and header, 1 and True may be used interchangeably.
Example:

>>> sht = xw.Book().sheets[0]
>>> df = sht.range('A1:D5').options(pd.DataFrame, header=2).value
>>> df
    a     b
    c  d  e
ix
10  1  2  3
20  4  5  6
30  7  8  9

# Writing back using the defaults:
>>> sht.range('A1').value = df

# Writing back and changing some of the options, e.g. getting rid of the index:
>>> sht.range('B7').options(index=False).value = df
The same sample for UDF (starting in Range('A13') on screenshot) looks like this:
@xw.func
@xw.arg('x', pd.DataFrame, header=2)
@xw.ret(index=False)
def myfunction(x):
   # x is a DataFrame, do something with it
   return x
xw.Range and ‘raw’ converters
Technically speaking, these are “no-converters”.
If you need access to the
xlwings.Rangeobject directly, you can do:@xw.func @xw.arg('x', xw.Range) def myfunction(x): return x.formula
This returns x as
xlwings.Rangeobject, i.e. without applying any converters or options.The
rawconverter delivers the values unchanged from the underlying libraries (pywin32on Windows andappscripton Mac), i.e. no sanitizing/cross-platform harmonizing of values are being made. This might be useful in a few cases for efficiency reasons. E.g:>>> sht.range('A1:B2').value [[1.0, 'text'], [datetime.datetime(2016, 2, 1, 0, 0), None]] >>> sht.range('A1:B2').options('raw').value # or sht.range('A1:B2').raw_value ((1.0, 'text'), (pywintypes.datetime(2016, 2, 1, 0, 0, tzinfo=TimeZoneInfo('GMT Standard Time', True)), None))
Custom Converter
Here are the steps to implement your own converter:
Inherit from
xlwings.conversion.ConverterImplement both a
read_valueandwrite_valuemethod as static- or classmethod:- In
read_value,valueis what the base converter returns: hence, if nobasehas been specified it arrives in the format of the default converter. - In
write_value,valueis the original object being written to Excel. It must be returned in the format that the base converter expects. Again, if nobasehas been specified, this is the default converter.
The
optionsdictionary will contain all keyword arguments specified in thexw.Range.optionsmethod, e.g. when callingxw.Range('A1').options(myoption='some value')or as specified in the@argand@retdecorator when using UDFs. Here is the basic structure:from xlwings.conversion import Converter class MyConverter(Converter): @staticmethod def read_value(value, options): myoption = options.get('myoption', default_value) return_value = value # Implement your conversion here return return_value @staticmethod def write_value(value, options): myoption = options.get('myoption', default_value) return_value = value # Implement your conversion here return return_value
- In
Optional: set a
baseconverter (baseexpects a class name) to build on top of an existing converter, e.g. for the built-in ones:DictCoverter,NumpyArrayConverter,PandasDataFrameConverter,PandasSeriesConverterOptional: register the converter: you can (a) register a type so that your converter becomes the default for this type during write operations and/or (b) you can register an alias that will allow you to explicitly call your converter by name instead of just by class name
The following examples should make it much easier to follow - it defines a DataFrame converter that extends the built-in DataFrame converter to add support for dropping nan’s:
from xlwings.conversion import Converter, PandasDataFrameConverter

class DataFrameDropna(Converter):

    base = PandasDataFrameConverter

    @staticmethod
    def read_value(builtin_df, options):
        dropna = options.get('dropna', False)  # set default to False
        if dropna:
            converted_df = builtin_df.dropna()
        else:
            converted_df = builtin_df
        # This will arrive in Python when using the DataFrameDropna converter for reading
        return converted_df

    @staticmethod
    def write_value(df, options):
        dropna = options.get('dropna', False)
        if dropna:
            converted_df = df.dropna()
        else:
            converted_df = df
        # This will be passed to the built-in PandasDataFrameConverter when writing
        return converted_df
Now let’s see how the different converters can be applied:
# Fire up a Workbook and create a sample DataFrame
sht = xw.Book().sheets[0]
df = pd.DataFrame([[1.,10.],[2.,np.nan], [3., 30.]])
Default converter for DataFrames:
# Write
sht.range('A1').value = df

# Read
sht.range('A1:C4').options(pd.DataFrame).value
DataFrameDropna converter:
# Write
sht.range('A7').options(DataFrameDropna, dropna=True).value = df

# Read
sht.range('A1:C4').options(DataFrameDropna, dropna=True).value
Register an alias (optional):
DataFrameDropna.register('df_dropna')

# Write
sht.range('A12').options('df_dropna', dropna=True).value = df

# Read
sht.range('A1:C4').options('df_dropna', dropna=True).value
Register DataFrameDropna as default converter for DataFrames (optional):
DataFrameDropna.register(pd.DataFrame)

# Write
sht.range('A13').options(dropna=True).value = df

# Read
sht.range('A1:C4').options(pd.DataFrame, dropna=True).value
These samples all work the same with UDFs, e.g.:
@xw.func
@arg('x', DataFrameDropna, dropna=True)
@ret(DataFrameDropna, dropna=True)
def myfunction(x):
    # ...
    return x
Note
Python objects run through multiple stages of a transformation pipeline when they are being written to Excel. The same holds true in the other direction, when Excel/COM objects are being read into Python.
Pipelines are internally defined by Accessor classes. A Converter is just a special Accessor which
converts to/from a particular type by adding an extra stage to the pipeline of the default Accessor. For example, the
PandasDataFrameConverter defines how a list of list (as delivered by the default Accessor) should be turned
into a Pandas DataFrame.
The Converter class provides basic scaffolding to make the task of writing a new Converter easier. If
you need more control you can subclass Accessor directly, but this part requires more work and is currently
undocumented.