Add-in & Settings#

The xlwings add-in is the preferred way to be able to use the Run main button, RunPython or UDFs.
Note that you don’t need an add-in if you just want to manipulate Excel by running a Python script.
Note
The ribbon of the add-in is compatible with Excel >= 2007 on Windows and >= 2016 on macOS. On macOS, all UDF related functionality is not available.
Note
The add-in is password protected with the password xlwings. For debugging or to add new extensions, you need
to unprotect it.
Run main#
New in version 0.16.0.
The Run main button is the easiest way to run your Python code: It runs a function called main in a Python
module that has the same name as your workbook. This allows you to save your workbook as xlsx without enabling macros.
The xlwings quickstart command will create a workbook that will automatically work with the Run button.
Installation#
To install the add-in, use the command line client:
xlwings addin install
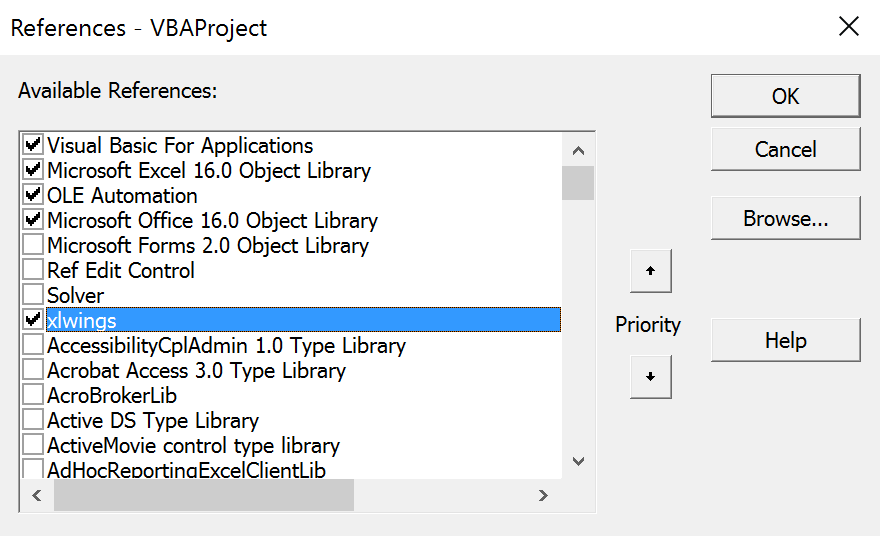
Technically, this copies the add-in from Python’s installation directory to Excel’s XLSTART folder. Then, to use RunPython or UDFs in a workbook, you need to set a reference to xlwings in the VBA editor, see screenshot (Windows: Tools > References..., Mac: it’s on the lower left corner of the VBA editor). Note that when you create a workbook via xlwings quickstart, the reference should already be set.

User Settings#
When you install the add-in for the first time, it will get auto-configured and therefore, a quickstart project should work out of the box. For fine-tuning, here are the available settings:
Interpreter: This is the path to the Python interpreter. This works also with virtual or conda envs on Mac. If you use conda envs on Windows, then leave this empty and useConda PathandConda Envbelow instead. Examples:"C:\Python39\pythonw.exe"or"/usr/local/bin/python3.9". Note that in the settings, this is stored asInterpreter_WinorInterpreter_Mac, respectively, see below!PYTHONPATH: If the source file of your code is not found, add the path to its directory here.Conda Path: If you are on Windows and use Anaconda or Miniconda, then type here the path to your installation, e.g.C:\Users\Username\Miniconda3or%USERPROFILE%\Anaconda. NOTE that you need at least conda 4.6! You also need to setConda Env, see next point.Conda Env: If you are on Windows and use Anaconda or Miniconda, type here the name of your conda env, e.g.basefor the base installation ormyenvfor a conda env with the namemyenv.UDF Modules: Names of Python modules (without .py extension) from which the UDFs are being imported. Separate multiple modules by “;”. Example:UDF_MODULES = "common_udfs;myproject"The default imports a file in the same directory as the Excel spreadsheet with the same name but ending in.py.Debug UDFs: Check this box if you want to run the xlwings COM server manually for debugging, see Debugging.RunPython: Use UDF Server: Uses the same COM Server for RunPython as for UDFs. This will be faster, as the interpreter doesn’t shut down after each call.Restart UDF Server: This restarts the UDF Server/Python interpreter.Show Console: Check the box in the ribbon or set the config toTRUEif you want the command prompt to pop up. This currently only works on Windows.ADD_WORKBOOK_TO_PYTHONPATH: Uncheck this box to not automatically add the directory of your workbook to the PYTHONPATH. This can be helpful if you experience issues with OneDrive/SharePoint: uncheck this box and provide the path where your source file is manually via the PYTHONPATH setting.
Anaconda/Miniconda#
If you use Anaconda or Miniconda on Windows, you will need to set your Conda Path and Conda Env settings, as you will
otherwise get errors when using NumPy etc. In return, leave Interpreter empty.
Making use of Environment Variables#
With environment variables, you can set dynamic paths e.g. to your interpreter or PYTHONPATH:
On Windows, you can use all environment variables like so:
%USERPROFILE%\Anaconda.On macOS, the following special variables are supported:
$HOME,$APPLICATIONS,$DOCUMENTS,$DESKTOP.
Config Hierarchy#
xlwings looks for settings in the following locations and order:
Workbook configuration
First, xlwings looks for a sheet called
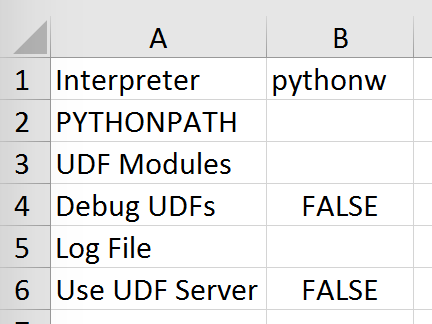
xlwings.conf. This is the recommended way to configure your workbook for deployment as you don’t have to handle an additional config file. When you run the quickstart command, it will create a sample configuration on a sheet called_xlwings.conf: remove the leading underscore in the name to activate it. If you don’t want to use it, feel free to delete the sheet.Directory configuration
Next, xlwings looks for a file called
xlwings.confin the same directory as your Excel workbook.User configuration
Finally, xlwings looks for a file called
xlwings.confin the.xlwingsfolder in the user’s home directory. Normally, you don’t edit this file directly—instead, it is created and edited by the add-in whenever you change a setting.
You will find more details about the each configuration type below.
Source: The section “Config Hierarchy” is taken from “Python for Excel by Felix Zumstein (O’Reilly). Copyright 2021 Zoomer Analytics LLC, 978-1-492-08100-5.”
User Config: Ribbon/Config File#
The settings in the xlwings Ribbon are stored in a config file that can also be manipulated externally. The location is
Windows:
.xlwings\xlwings.confin your home folder, that is usuallyC:\Users\<username>macOS:
~/Library/Containers/com.microsoft.Excel/Data/xlwings.conf
The format is as follows (currently the keys are required to be all caps) - note the OS specific Interpreter settings!
"INTERPRETER_WIN","C:\path\to\python.exe"
"INTERPRETER_MAC","/path/to/python"
"PYTHONPATH",""
"ADD_WORKBOOK_TO_PYTHONPATH",""
"CONDA PATH",""
"CONDA ENV",""
"UDF MODULES",""
"DEBUG UDFS",""
"USE UDF SERVER",""
"SHOW CONSOLE",""
"ONEDRIVE_CONSUMER_WIN",""
"ONEDRIVE_CONSUMER_WIN",""
"ONEDRIVE_COMMERCIAL_WIN",""
"ONEDRIVE_COMMERCIAL_MAC",""
"SHAREPOINT_WIN",""
"SHAREPOINT_MAC",""
Note
The ONEDRIVE_WIN/_MAC setting has to be edited directly in the file, there is currently no possibility to edit it via the ribbon. Usually, it is only required if you are either on macOS or if your environment variables on Windows are not correctly set or if you have a private and corporate location and don’t want to go with the default one. ONEDRIVE_WIN/_MAC has to point to the root folder of your local OneDrive folder.
Directory Config: Config file#
The global settings of the Ribbon/Config file can be overridden for one or more workbooks by creating a xlwings.conf file
in the workbook’s directory.
Note
Workbook directory config files are not supported if your workbook is stored on SharePoint or OneDrive.
Workbook Config: xlwings.conf Sheet#
Workbook specific settings will override global (Ribbon) and workbook directory config files:
Workbook specific settings are set by listing the config key/value pairs in a sheet with the name xlwings.conf.
When you create a new project with xlwings quickstart, it’ll already have such a sheet but you need to rename
it from _xlwings.conf to xlwings.conf to make it active.

Alternative: Standalone VBA module#
Sometimes, it might be useful to run xlwings code without having to install an add-in first. To do so, you
need to use the standalone option when creating a new project: xlwings quickstart myproject --standalone.
This will add the content of the add-in as a single VBA module so you don’t need to set a reference to the add-in anymore.
It will also include Dictionary.cls as this is required on macOS.
It will still read in the settings from your xlwings.conf if you don’t override them by using a sheet with the name xlwings.conf.